On a quest to work smarter (not harder) when it comes to HMI design so you can stay ahead of the curve? Shaving even a few seconds off a common step in your process can have a significant compound impact on the time you spend building HMI screens.
To that end, here are 10 HMI design tips to speed up building in Ignition Perspective, offered by Inductive Automation Sales Engineer Reese Tyson. He originally shared these best practices in our webinar “Design Like A Pro: 25+ Tips For Lightning-Fast Development.”
While there are a ton of speed-enhancing Ignition tools, these are hidden gems that you might not already know about. You’ll definitely want to add these to your toolbox because they will help you optimize your design workflow and achieve maximum efficiency!
Tip 1: View Tag Utilization With Active Subscriptions
Thanks to the Tag Reference Tracker, you can use Active Subscriptions to quickly view where you’re using a tag. First, ensure that the Tag Reference Tracker is enabled in your gateway settings. Then, in the Ignition designer, just right-click on a tag, and select “View Tag Diagnostics.” From there, you can access Active Subscriptions. “It gives you the root container, any containers that are inside of that root container, and then all the way down to the property and what type of binding that is using that tag,” Tyson says.
Tip 2: Get Instances Of Tag Usage With The Reference Log
This next tip is another way to make good use of the Tag Reference Tracker. Within “Tag Diagnostics,” you can also access the Reference Log. “The Reference Log is going to give an instance of where [a] tag is used, either in the client or in the designer,” Tyson explains. This usage could be reads, writes, subscriptions, configuration changes, etc. Just like with Active Subscriptions, to use the Reference Log, you’ll need to ensure that the Tag Reference Tracker is enabled in your gateway settings.
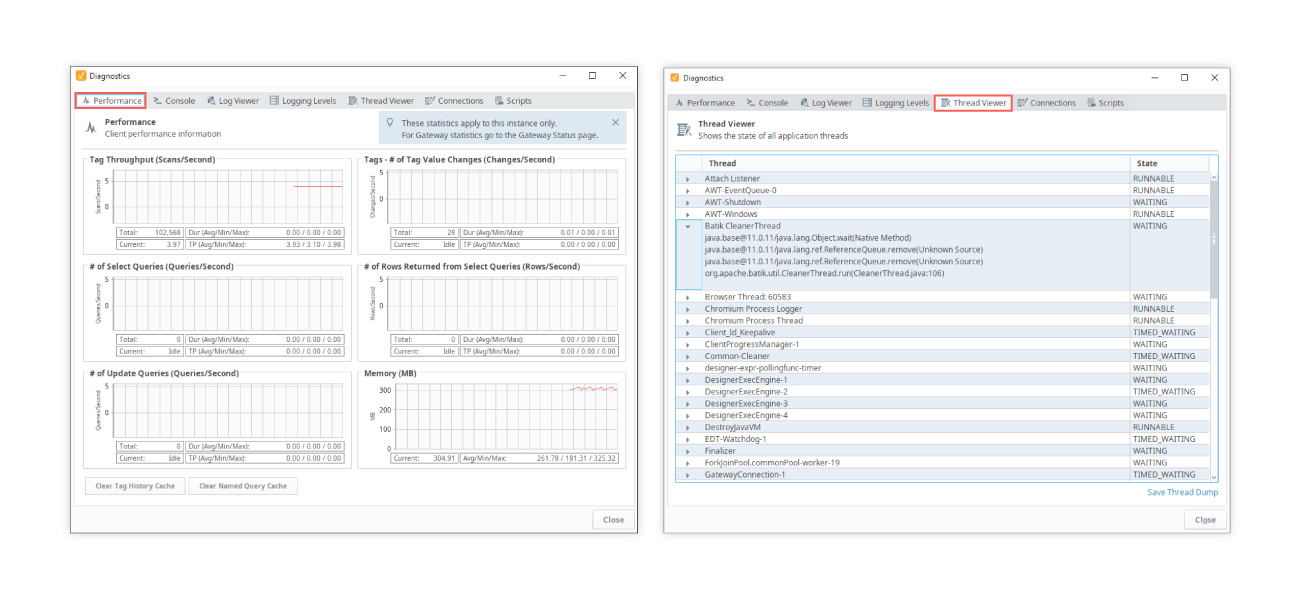
Tip 3: Speed Up Troubleshooting With The Help Of Diagnostics View
One way to troubleshoot more quickly is by accessing designer statistics via the Designer Diagnostics view (go to Help > Diagnostics in the designer). This window has numerous tabs such as “Performance” (to see, for example, how much memory you’re using, or tag throughput), and “Thread Viewer” (to see all threads and their states). Tyson offers an example of when this can come in handy: “If you call into support and you're having designer issues, the support rep might ask you to save a thread dump, which you can do here.”

Tip 4: Specify Tab Order Across Your UI
Tab Index is a feature that enables you to specify what happens when you press your keyboard’s tab key. As Tyson explains, “Traditionally, Perspective uses the logical draw order of the component, or, in layman's terms, top to bottom of the view ... but say you wanted to mix that order up, you can do that with Tab Index.” To achieve this, go to Meta > tabIndex in Perspective’s property editor, and input a number to correspond with the order you want to tab through components. Note that Tab Index is not a part of the meta properties by default, so you’ll need to add it in.
Tip 5: Leverage Handy Keyboard Shortcuts
“This one I use all the time, and if you aren't aware of it, it's going to save you a ton of time,” Tyson says. “... In [Ignition] 8.1.26, we added an Alt + Shift + Click hotkey that allows you to drill all the way down to components at the lowest level.” This Deep Selection shortcut bypasses the need to double-click and then click into a container in order to access a component in Perspective.
A couple additional useful shortcuts are to toggle preview mode in the designer with the F5 key, and to press F10 to launch a client. For a host of keyboard shortcuts in the designer, check out “Windows, Linux, and Mac Keyboard Shortcuts” in the Ignition User Manual.

Tip 6: Double-Click On Labels & Buttons To Edit Text
This next tip is a simple way to save time when you need to edit the text on a label or button. Rather than going over to the properties area, you can just double-click on the label/button, make your update, hit enter, and it will update the text property. According to Tyson, it’s “really handy, maybe saves you a couple seconds on going over to the properties on the right-hand side.”
Tip 7: Specify Components to Automatically Grow/Shrink
This is a quick way to improve the appearance of your HMI layout by ensuring the interface elements will automatically adapt to an appropriate size. If you’re, for example, using dynamic text within a component where the text could be different every time you view it, specifying the component to automatically grow or shrink based on the content within it is a simple way to improve user experience. “You can also do this with containers and pretty much any Perspective component. The size of the component is going to be based off the content that is inside of that component,” Tyson says. You can accomplish this by going to the property editor and setting the component’s basis to “auto” instead of specifying a number.
Tip 8: Copy/Paste Bindings
If you have a lot of scripts specified on your binding, this tip is a valuable time-saver. Simply right-click on a property that has a binding specified, and click on “Copy Binding” in order to copy the binding. “That would include all of the binding, any sort of transform, any scripts, mapping, formats, etc.,” Tyson explains. You can then paste that binding elsewhere by right-clicking and selecting “Paste Binding.”
By copy/pasting a binding, you’ll save time by not having to redo an entire binding — you can just paste a binding in and then edit only what you need to (say, a tag path for example).

Tip 9: Use Built-In Color Themes
Take advantage of Ignition’s built-in color themes to save time during industrial interface design. “We've tried to put all the colors that you're ever going to need in an HMI/SCADA application, including things like quality of a tag or query or an error,” Tyson says.
You can use one of the built-in themes by selecting your preferred theme in Session Props > Theme in the property editor (visit the Perspective Built-In Themes section of the Ignition User Manual to view the different colors for each theme). Then input the name of the CSS variable for your component in Style > backgroundColor in Perspective’s property editor, and voilà! The color of the component will automatically change if you switch to a different theme.

Tip 10: Send Data With system.perspective.sendMessage
This last tip is an easy way to send data across a Perspective screen. system.perspective.sendMessage lets you send a message from one event to a corresponding message handler. “This lets you pass data around a Perspective view without having to use all the in and out parameters,” Tyson says, “especially if you had embedded views inside of embedded views ... You don't need to tunnel those parameters all the way through; just use message handlers.”
Start Building Your Best HMIs Ever
If you want to lead the pack when it comes to designing HMI displays, see what’s possible with an unlimited free trial of Ignition HMI — the industry’s fastest tool for creating beautiful, cutting-edge HMIs.