Understanding how navigation works in Ignition is very important. There are several different navigation strategies you can create in Ignition. This how-to covers the most basic and widely used navigation strategy where you have a single window visible at a time. The how-to also covers how windows resize with different screen resolutions.
Part 1: Understanding Windows & Navigation
Every Ignition project contains a collection of Windows. Windows are the fundamental building blocks for projects using the Vision module. Windows contain a hierarchy of components. Components are visual elements that range in complexity from a single Button and Label, to the powerful Easy Chart and Table components.
In the client (aka runtime) the only way to see contents of a window is if the window is opened. There are two ways a window can get opened in the client:
- Open on Startup - Window is set to open after login screen.
- Opened through Scripting - Window is opened from some event: clicking a button, tag change, key press, etc.
The first part to consider when configuring a new project is what windows you want to open on startup (once a user logs into the client). These windows are going to be the first thing that a user will see. In a typical navigation strategy you will have two windows open on startup: one docked and one main window (filling in the rest of the space). From these windows other windows can be opened and closed.
At any given time any number of windows can be opened in the client. You can see how many windows are opened using the Windows menu bar item. Keep in mind, any window that is opened may need resources such as running SQL queries or getting tag values. It is not a good idea to just keep opening windows since each window is running. Whatever windows a user is not using should be closed.
The second way a window can be opened is through scripting. Ignition provides you with a number of built-in system functions to accomplish tasks such as opening, closing, centering, and swapping windows. These functions are found in the user manual under Appendix C. Scripting functions -> system.nav. The functions that open windows are the following:
- system.nav.openWindow
- system.nav.openWindowInstance
- system.nav.swapWindow
- system.nav.swapTo
- system.nav.goBack
- system.nav.goForward
- system.nav.goHome
We will cover a few of these functions in this how-to. Next, let's look at the three typical window types in Ignition.
By manipulating a window's properties, you can transform it into various configurations. Typically, you'll alter the window's Dock Position, Border Display Policy, Titlebar Display Policy, and Start Maximized properties to change windows into one of three categories:
- Screens
- Docked Windows
- Popup Windows
A "screen" window is one that is set to start maximized, and has its border and titlebar display policies set to When Not Maximized or Never. This will make the window take up all available space (minus space used by any "docked" windows). This makes the window act much like a typical "HMI screen." You may also see these referred to as "main" windows, typically when referring to the currently visible one.
A "docked window" has the Dock Position set to anything but Floating. This will make the window stick to one side of the screen, and nothing can overlap it. It will also typically have its border and titlebar display policies set to Never. This makes the "docked" window appear to be joined seamlessly with the current "screen" window.
These screens are usually tall and skinny or short and wide, depending on the side they're docked to. The purpose of a docked window is to make some information always available; typically navigation controls and overall status information. Using docked windows can help eliminate repetitive design elements from being copied to each screen, making maintenance easier.
A "popup window" is a window with the Dock Position set to Floating and is not maximized. Its border and titlebar display policies are usually set to When Not Maximized or Always, so that they can be manipulated by the end-user. This is how all windows start out when first created. These windows are often opened by components in the current "screen" window, and are meant to be on top of the screen. To this end, they may have their Layer property set to a number higher than zero so they don't get lost behind the "screen" window.
Popup windows are often parameterized so they can be re-used.
Part 2: Basic Navigation Strategy
The typical navigation strategy for a project is to have a "docked" window or two (usually docked north and/or west) and a single "screen" (main window) visible at a time. For example, you may have a header window docked north with your company logo, navigation buttons and status information. You may also have an overview window opened as the main window. If you want to switch the overview window with a historical trending window then you want to swap the two windows. Swapping ensures that only one window is open at a time. Popup windows do not fall under this category since they are not main windows.
This style of project is so common, that the default operation of the Tab Strip component expects it. When it is in its default automatic operation, it expects that each tab represents a "screen" window (main window), and will automatically swap from the current screen to the desired screen. Furthermore, the [System]/Client/User/CurrentWindow tag is calculated based upon this strategy: its value is the name of the current maximized window. If you have more than one main window open a time this navigation strategy will fail since the system expects a single main window. * Note: If your Tab Strip or swapTo function is not working check to see if you have more than ONE main window opened.
The Tab Strip component works off of the current window variable. When a project first loads, the variable will hold the main window set to open on startup. The Tab Strip utilizes the system.nav.swapTo function which swaps from the current window (stored in that variable) to a new window and updates the current window variable. At any time you can perform a system.nav.getCurrentWindow() or check the [System]/Client/User/CurrentWindow tag to see what Ignition thinks the main window is. If you have two main windows opened Ignition will be confused as to which one you want to perform the swap.
If you want to use your own buttons or other component to perform the navigation just make sure to use the system.nav.swapTo instead of the system.nav.swapWindow. The system.nav.swapWindow function takes a window to swap from and a window to swap to. The function does not utilize the current window variable in Ignition. * Note: The system.nav.swapWindow is the default function when swapping is selected on the Event Handler Navigation tab.
As swapping occurs in the client a history of windows is stored internally. You have the ability to go backwards or forwards through this history (array) using the system.nav.goBack and goForward functions. The system.nav.goHome function simply takes you to the first main window that was opened in the client, which typically is the main window set to open on startup.
To open popup windows you just simply need to open the window using the system.nav.openWindow or openWindowInstance.
Part 3: Setup Basic Navigation Windows
1) First, we need to create the "docked" window as our header window to display the logo, tab strip and information. In the designer, click on the New Window icon in the toolbar or use the File > New > Window menu item.
2) Right click on the new window and select Rename or press F2. Rename the window to Navigation.
3) In the Property Editor change the following properties for this window (if you don't see all of these properties make sure the filter is set to All instead of Basic):
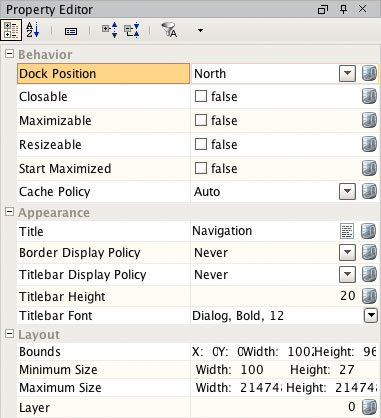
There the Dock Position property is set to North making it a docked window.
4) We need this window to open on startup so right click on the window in the Project Browser and check the Open On Startup box if it is not checked.
5) You can add your company logo and navigation buttons to this window. I prefer the Tab Strip component. Drag in the Tab Strip component from the Buttons tab of the Component Palette.
6) Now we need to configure the tabs. Right click on the Tab Strip component and select Customizers > Tab Strip Customizer. There you can alter, add, or delete tabs. In order to make swapping work set the Tab Name to the name of the window to swap to. The Display Name can be whatever you want.

7) Now we just need some main windows. Create another window and rename it to Overview.
8) In the Property Editor change the following properties for this window:
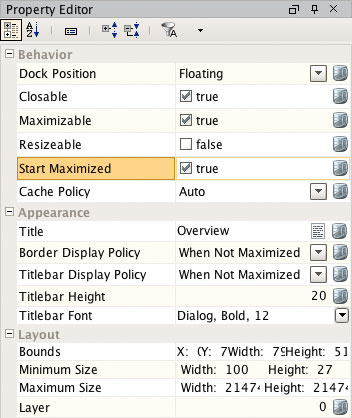
There the Start Maximized flag is checked making it a main window.
9) Go ahead and follow those steps again to make more main windows. Make sure the main window you want to open on startup has the flag checked like we did with the Navigation window above.
10) That's it! You should now have a basic navigation stucture set in place. If you need popup windows make sure those windows have the following properties:
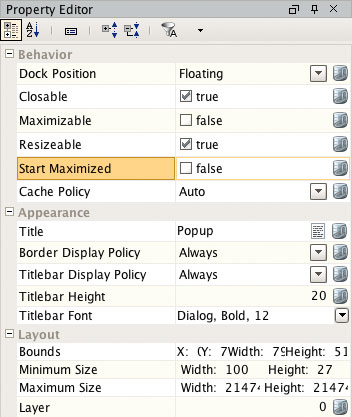
Popup windows are NOT set to start maximized and are resizeable.
Part 4: Client Resizing and Minimum Size
How windows and components resize to different resolutions is always a key topic for Ignition. Windows are the easiest to talk about first. Only two types of windows will resize automatically: ones that are docked and ones that are maximized. Docked windows will only resize in either the height or width, but not both (depends on dock position). Maximized windows will resize in both in width and height. Both of these are governed by the client size. Smaller resolutions will have smaller sizes and larger resolutions can have larger sizes. Users have the ability on popup windows to resize them manually.
Components inside of windows will only resize if the window they are in resizes. How that component resizes is up to the layout of the component. There are two layout modes, and they are set on a per-component basis. Both affect the component's size and position relative to its parent container. The root container's size is dictated by the window size.
Relative layout is the default mode. This is a simple but effective layout mode that simply keeps a component's size and position relative to its parent container constant, even as the parent container grows or shrinks. More precisely, it remembers the component's position and size as a percentage of its parent's bounds at the last time the window was saved. Relative layout also has the option of scaling a component's font appropriately.
Anchored layout lets you specify various "anchors" for the component. The anchors dictate how far each of the four edges of the component stay from their corresponding edges in the parent container. For example, if you anchor top and left, then your component will stay a constant distance from top and left edges of its parent. Since you didn't specify an anchor for the right or bottom sides, they won't be affected by the layout.
Typically components inside of docked windows have an anchored layout. Components inside of main windows and popup windows usually are relative but can be a mixture of the two.
Client Minimum Size
Clients can define a minimum size, because even with dynamic layout, you usually don't want the client to get too small. This is because it would become unusable and unreadable. This is what the Minimum Size property is for. By default it is set to 800x600, but you can adjust it in the designer under Project -> Properties menu item then Client -> User Interface. Simply put, if the size of the client gets smaller than the minimum size the client will get scrollbars instead of resizing the windows inside of it.
The entire example above with this navigation strategy is used in an Example Project available online for you to download here (right click and select 'Save As'). It is a Project file that you can add to your Ignition Gateway in the configuration section under Projects -> Upload from backup.
If you have any questions on any of these topics please feel free to ask a question in the forum or call us at (800) 266-7798.