Rockwell's PanelView Plus 6 (part number 2711P-T12C4D9) terminals run on Windows CE version 6.0 with extended features. Since it runs with extended features you can launch Ignition clients on the terminal. You cannot launch the Ignition client natively because Windows CE does not support the Java Runtime Environment (JRE). However, Ignition has a Mobile Module that allows you to launch clients on non-JRE supported devices such as iOS, Android, Google TV and other devices. The Mobile Module normally uses the HTML 5 canvas component to deliver mobile applications but Windows CE doesn't have a HTML 5 supported web browser. So the only way we can launch clients on the terminal is through the Mobile Module's VNC support. The Mobile Module also acts as a VNC viewer (if activated) that allows VNC clients to launch a project.
This how-to describes the steps you need to do in order to run an Ignition client on a Rockwell PanelView Plus 6 (with extended featues).
First, we need to download, install and configure the Mobile Module for Ignition. If you don't already have the Mobile Module you can download the Mobile-module.modl from:
https://inductiveautomation.com/downloads/ignition
Once downloaded, open the Ignition Gateway configuration page and log in. Select Configuration > Modules from the menu on the left. If the Mobile Module does not exist in the list click on the Install or Upgrade a Module link at the bottom. Browse for the Mobile-module.modl file and choose Install.

Once the Mobile Module is installed we need to enable it as a VNC server. In the Ignition Gateway configuration page select Mobile > Settings from the menu. Check the Show Advanced Properties? checkbox. Now check the Enable VNC checkbox and make sure the VNC port is 5900.
The Mobile Module only allows one project to be viewed through VNC so you need to set the Project Name to one of your projects under Configuration > Projects. Press Save Changes to apply the new settings.

Next, we need to configure the PanelView Plus 6. Let's now install the VNC viewer application on the PanelView. Download the open-source .NET VNC viewer application (vncviewer-bin-1.0.1.zip) from the following url:
http://sourceforge.net/projects/dotnetvnc/files/vncviewer/1.0.1/
Unzip the file and it will create a folder called vncviewer. In that folder create a new file called config.vncxml with the following contents:
<Connection> <ConnMode>Active</ConnMode> <Host>10.20.5.2</Host> <Port>5900</Port> <PixelSize>Force 16-bit</PixelSize> <FullScreen>True</FullScreen> <FullColor>True</FullColor> <Orientation>Portrait</Orientation> <ClientScaling Width="0" Height="0">None</ClientScaling> <ServScaling>Default</ServScaling> <ShareServer>True</ShareServer> <ViewOnly>False</ViewOnly> <ScrnUpdAlgo>Batch</ScrnUpdAlgo> <SendMouseLocationWhenIdle>True</SendMouseLocationWhenIdle> <MouseAccelMode MouseSpeed="Normal">True</MouseAccelMode> </Connection>
Change the Host to the IP address of your Ignition server (where Ignition is installed). Make sure port 5900 is open on the server's firewall or you won't be able to connect to it. Copy the vncviewer folder to a USB key. Plug the USB key into the PanelView and copy the vncviewer folder to the root directory (like C:\).
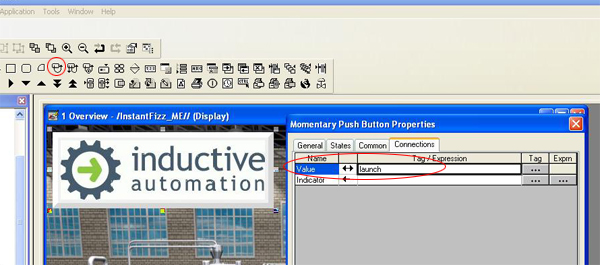
Next, we need to add a button to the PanelView project to invoke the VNC viewer application. Open your application in the FactoryTalk View Studio. Find a window to put the button in. The only way to launch the VNC viewer is through the use of a memory tag. Create a HMI tag named launch that is a Digital type from the Memory data source with initial value of 0. Next, drag in a Momentary Button from the toolbar into the window and assign the launch tag to the Value property under Connections in the button's property editor.
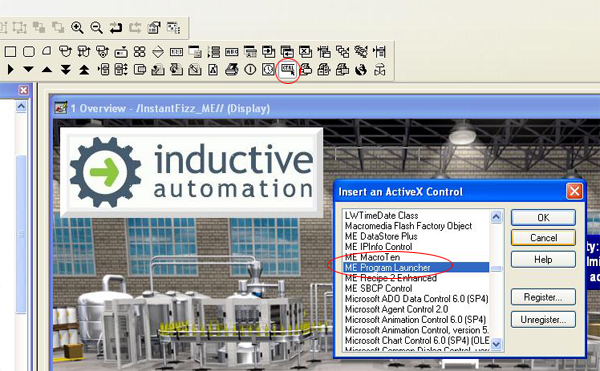
In order to launch the VNC viewer we need to add an ActiveX control to the window. Drag in the ActiveX object from the toolbar into the window and select the ME Program Launcher and press OK.
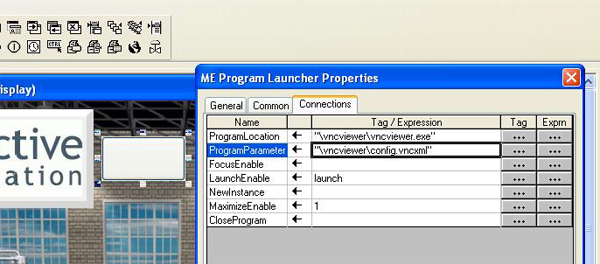
Right click on the control and select Properties and enter the following into the Connections tab:
ProgramLocation: "\vncviewer\vncviewer.exe" ProgramParameter: "\vncviewer\config.vncxml" LaunchEnable: launch MaximizeEnable: 1
Make sure you have quotes around the ProgramLocation and ProgramParamter. You don't need a drive letter to access the folder at the root.
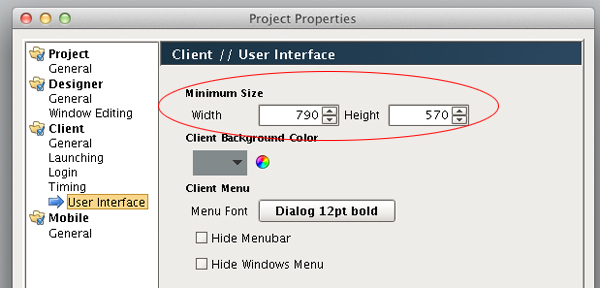
Put the ActiveX control under the momentary button so you don't see it. Now when the launch tag gets set to 1 the PanelView will open the VNC viewer maximized. Once you exit the client it will return to the PanelView project. Now all that is left is to make sure your project is set to open at the right resolution. Open your project in the Ignition Designer. Select Project > Properties from the top menu. Select Client > User Interface and set the Minimum Size of the project to 790 x 570.
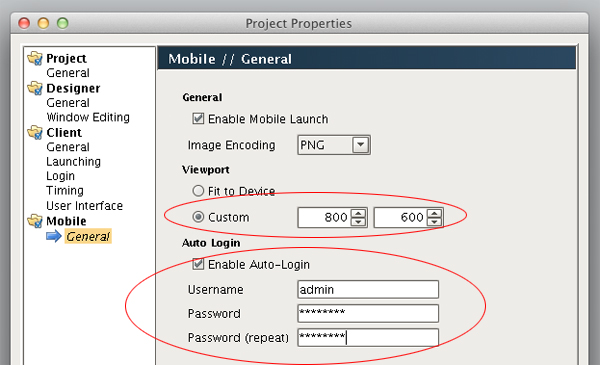
Next, let's set the projects size when launching using the Mobile Module. Select Mobile > General and set the Viewport to Custom at 800 x 600. If you want the projec to auto-login enable it and enter the username and password.
That's it! Give it a try. Download the application from FactoryTalk View Studio to your PanelView to see it in action. If you have any questions email us at support@inductiveautomation.com.